Microscope Diagram
The parts of a compound light microscope and what each does, from the eyepiece and objectives to the stage, condenser, diaphragm, lamp and focus knobs.
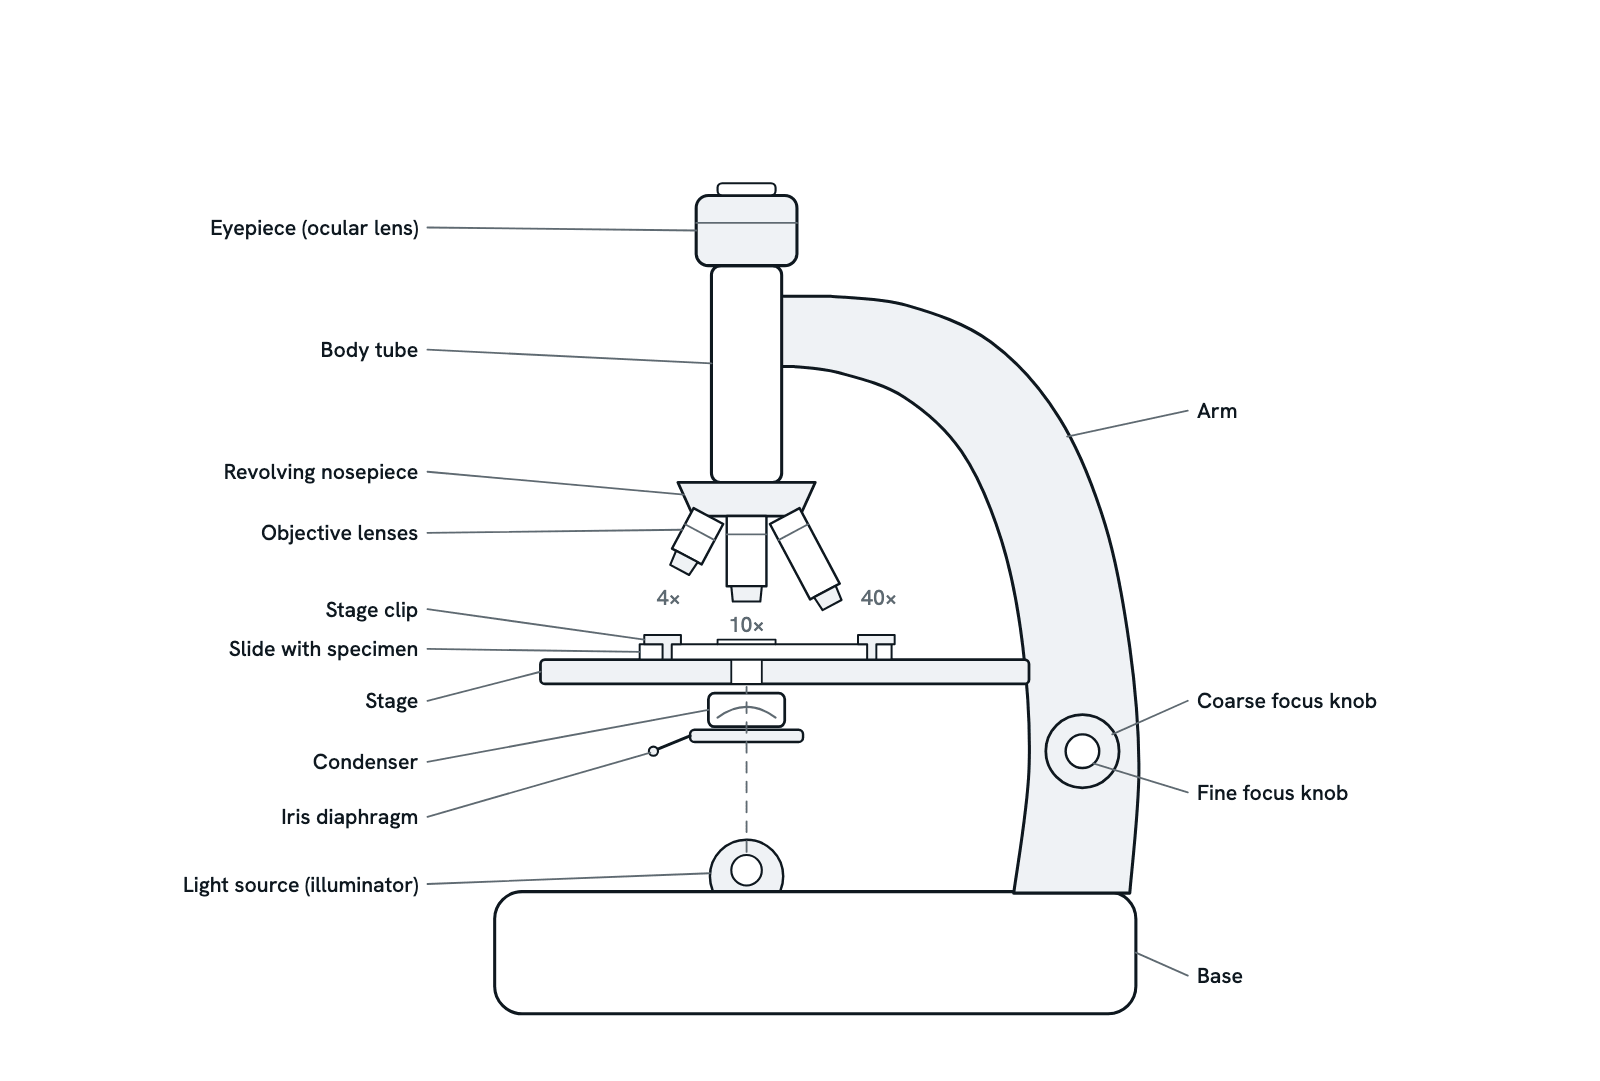
A compound light microscope from the side: the eyepiece and body tube above, the revolving nosepiece with its objectives, the stage with a slide, the condenser, iris diaphragm and lamp below, and the arm with the focus knobs. Press any part for what it does, or take the tour, which also covers magnification, resolution and how to focus without breaking a slide.
Also called Parts of a microscope, Compound light microscope or Light microscope.
Press any part of the diagram, or pick one here, to see what it is and what it does.
Download the diagramChecked against its sources on 5 November 2026.
A tour
A tour of the microscope
01The compound microscope
A compound light microscope magnifies in two stages. The objective, close to the specimen, forms a real, inverted and magnified image inside the body tube; the eyepiece then enlarges that image again into the virtual image you see. Microscopes built from lenses in a tube date from about 1590, and Robert Hooke's, with a stage, a light source and three lenses, already looked much like today's.
02The path of light
The lamp in the base sends light up through the iris diaphragm and the condenser, which focuses it into a cone through the specimen on the slide. The light that passes through the specimen enters the objective, travels up the body tube and leaves through the eyepiece into your eye. Every other part of the microscope either shapes this beam or holds a lens in its path.
03Total magnification
Multiply the objective's magnification by the eyepiece's. With a 10× eyepiece, the 4× objective gives 40×, the 10× gives 100× and the 40× gives 400×; a 100× oil-immersion objective gives 1000×. Beyond about 1000 times the numerical aperture of the objective the extra magnification is empty: the image gets bigger but shows no more detail.
04Which objective, and when
Start with the 4× scanning objective to find the specimen, then move up: the 10× is used most of the time, and the 40× shows fine detail. A good set is parfocal, so after switching objectives only a touch of fine focus is needed. The working distance shrinks as the power rises, to a fraction of a millimetre at the highest powers, so a high-power lens can hit the slide.
05The stage and the slide
The slide lies on the stage, held by clips or by the slide holder of a mechanical stage, which moves it precisely without touching it. The image is inverted, upside down and reversed, so the specimen seems to move the opposite way to the slide. Focusing means changing the distance between slide and objective; on most microscopes the knobs move the stage.
06Condenser and iris diaphragm
The condenser concentrates the lamp's light into a cone that fills the objective; keep it close under the stage. The iris diaphragm sets the width of that cone. Closing it raises contrast and depth of focus but lowers resolution; opening it gives a brighter image with less contrast. A common setting is about 80% of the objective's numerical aperture, changed for each objective and specimen.
07Focusing without breaking a slide
Lower the stage with the coarse knob, click the 4× objective into place, open the diaphragm and clip the slide in. Watching from the side, raise the stage until the objective is close to the slide; then look through the eyepiece and focus by moving them apart, never together. Use the coarse knob at low power; at high power, where the working distance is a fraction of a millimetre, the fine knob is all you need.
08Resolution, the real limit
Magnification is not the limit; resolution is. Two points can be told apart only if they are about half a wavelength of light apart: d = λ / 2NA, where the numerical aperture NA is n sin θ, the refractive index of the medium times the sine of half the angle of light the objective collects. With green light (550 nm) and the best oil objectives (NA 1.4) that is about 0.2 µm, so a light microscope cannot resolve detail finer than about 200 nm, however much it magnifies.
09Oil immersion at 100×
In air, no objective reaches a numerical aperture much above 0.95. Immersion oil, with a refractive index of about 1.51, close to glass, fills the gap between the 100× lens and the cover slip, so the lens collects a wider cone of light: the NA rises to 1.4 and resolution improves by about half as much again. Use the 100× lens only with oil, the oil its maker specifies, and clean it with lens paper afterwards.
10Care of the microscope
Carry the microscope upright by the arm, never by the eyepiece, and never turn it on its side: the eyepieces can fall out. Clean lenses only with lens paper, never with a cloth or tissue, and use a cleaning liquid only if your lab allows it. When you finish, turn the lowest-power objective into place, lower the stage, remove the slide, switch off the lamp and cover the microscope.
Parts
What each part of the microscope does
- Eyepiece (ocular lens)
- The lens you look through, at the top of the body tube, usually 10×. It enlarges the real image formed by the objective into the virtual image you see; on a binocular microscope one eyepiece can be focused separately to suit each eye.
- Body tube
- The tube that holds the eyepiece at one end and, on the nosepiece, the objectives at the other, keeping the two lens systems the right distance apart.
- Arm
- The curved upright that joins the body tube to the base and carries the focus knobs on its side. Carry the microscope by the arm, never by the eyepiece.
- Revolving nosepiece
- A turret under the body tube that holds the objectives. Turn it until the objective you want clicks into place over the specimen.
- Objective lenses
- The lenses nearest the specimen, each with its magnification engraved on it: a 4× scanning lens for finding the specimen, the 10× used most of the time, 40× for fine detail, and often a 100× oil-immersion lens. The working distance shrinks as the power rises.
- Stage
- The platform that holds the slide, with an opening in the middle for light from below. The focus knobs move it up and down; a mechanical stage lets you shift the slide precisely without touching it.
- Stage clips
- Simple spring clips that hold the slide in place on the stage. Better microscopes have a mechanical stage with a slide holder instead.
- Slide with specimen
- A glass slide carrying the specimen, usually under a thin cover slip; most objectives are designed for a cover glass 0.17 mm thick. The image is made from the light that passes through the specimen, so it must be thin.
- Condenser
- A lens system under the stage that gathers light from the lamp and concentrates it into a cone through the specimen. Keep it close under the stage; its focus and its aperture set both contrast and resolution.
- Iris diaphragm
- An iris in the condenser, worked by a lever or ring, that opens or closes the aperture the light passes through. Closing it raises contrast and depth of focus but lowers resolution; opening it gives a brighter image with less contrast.
- Light source (illuminator)
- The lamp in the base, which sends light up through the diaphragm, the condenser, the specimen and the lenses. A ground-glass diffuser in it spreads the light evenly over the field.
- Coarse focus knob
- The large knob that moves the stage up and down quickly. Use it with the low-power objective, watching from the side so that the lens never touches the slide.
- Fine focus knob
- The small knob, drawn here inside the coarse one, that moves the stage by tiny amounts to sharpen the image. With a parfocal set of objectives, a touch of fine focus is all that is needed after switching to a higher power.
- Base
- The heavy foot that supports the whole instrument and holds the lamp. Never turn the microscope on its side or upside down: the eyepieces can fall out.
Dictionary
The terms to know
Practise it
The quizzes and cards that fit
- Cell Biology quizzes
- Characteristics of Life15 questions
- Lab Safety15 questions
- Cell Theory15 questions
- Microbiology quizzes
- Gut Microbiome15 questions
- Tuberculosis15 questions
- Protists15 questions
- Cell Biology flashcards
The subject's terms as a ready-made deck, free to flip through.
- Hemocytometer Calculator
Cells per mL, viability with trypan blue, total cells and the volume to seed, from a hemocytometer count.
Next to it
More diagrams
Sources
Where the facts come from
- Florida State University, Molecular Expressions: Anatomy of the Microscope
- Florida State University, Molecular Expressions: Microscope Magnification
- Florida State University, Molecular Expressions: Numerical Aperture and Resolution
- Florida State University, Molecular Expressions: Microscope Objectives
- Florida State University, Molecular Expressions: Objective Specifications and Identification
- Florida State University, Molecular Expressions: Substage Condensers
- Rice University, BIOS 211: Light Microscopy
- University of San Diego, Animal Development Lab Manual: Introduction to Microscopy
- Schermelleh, Heintzmann and Leonhardt, A guide to super-resolution fluorescence microscopy, Journal of Cell Biology, 2010 (PubMed Central)
- Wollman and others, From Animaculum to single molecules: 300 years of the light microscope, Open Biology, 2015 (PubMed Central)
Drawn and written by biofideX from these sources.